
Let’s look at how you can set up the UTM parameters in the Google Ads Final URL Suffix in the most efficient way possible. This method of using UTM parameters in your Google Ads is also known as Google Ads manual tagging.
Before we begin, we will assume you already have basic understanding of the UTM parameters and their purposes in attributing website traffic and conversions.
We will go through the steps in using the tracking options in your Google Ads account like the Final URL Suffix, Custom Parameters and ValueTrack Parameters to quickly add the UTM parameters to all of your Google Ads campaigns.
By the end of this tutorial, you’ll have a solid UTM tracking setup in place for your Google Ads and your website analytic tools (Google Analytics and our AFL UTM Tracker) will be able to pick up your UTM parameters without a hitch.
Step 1: Understanding the Google Ads tracking URL
First let’s take a look at how your full Google Ad URL should look like when the user clicks on your Google Ads.
https://www.example.com/my-service/?utm_source=google&utm_medium=cpc&utm_campaign=new_year_saleYour Google Ads tracking URL will consists of two parts (Final URL and URL Parameters):
Final URL
The Final URL is the landing page on your website where you want your users to visit after clicking on your Google Ads.
https://www.example.com/my-service/URL Parameters
Everything after the Final URL is the URL parameters. It is also technically known as the URL query parameters or the URL search parameters. But for the purpose of analytic tracking, the parameters we want to use are commonly known as the UTM parameters.
?utm_source=google&utm_medium=cpc&utm_campaign=new_year_sale- To add a URL parameter, you must first add a question mark character “?” after the website URL or the page URL.
- Then follow by the name of the parameter, an equal sign “=” character and the value for the parameter ( e.g utm_source=google ).
- To add more than one parameter, you will need to separate each parameter with a “&” character (as seen above).
Google Ads provides you a list of tracking parameters called the ValueTrack parameters where you can use them in your tracking URL format. For example, you can pass keyword that the user is searching for by using the {keyword} placeholder in the tracking URL.
At the same time, Google Ads also provides you with the capability to create Custom parameters where you can set a specific value to be passed to your tracking URL.
Step 2: Set up Custom Parameters
Now I imagine that you have many campaigns running concurrently in your Google Ads account.
How does your analytic tools know which campaign the visitor had arrived from? It works by picking up the campaign name from the utm_campaign parameter in the tracking URL.
But since Google Ads does not provide us with a ValueTrack Parameter for the actual campaign name (although it does provide you with a parameter for Campaign ID, it is useless to non-Google analytic tools). So we will have use the Google Ads’ Custom Parameter to set the campaign name for all of your campaigns.
Here are the step you need to perform in chronological order.
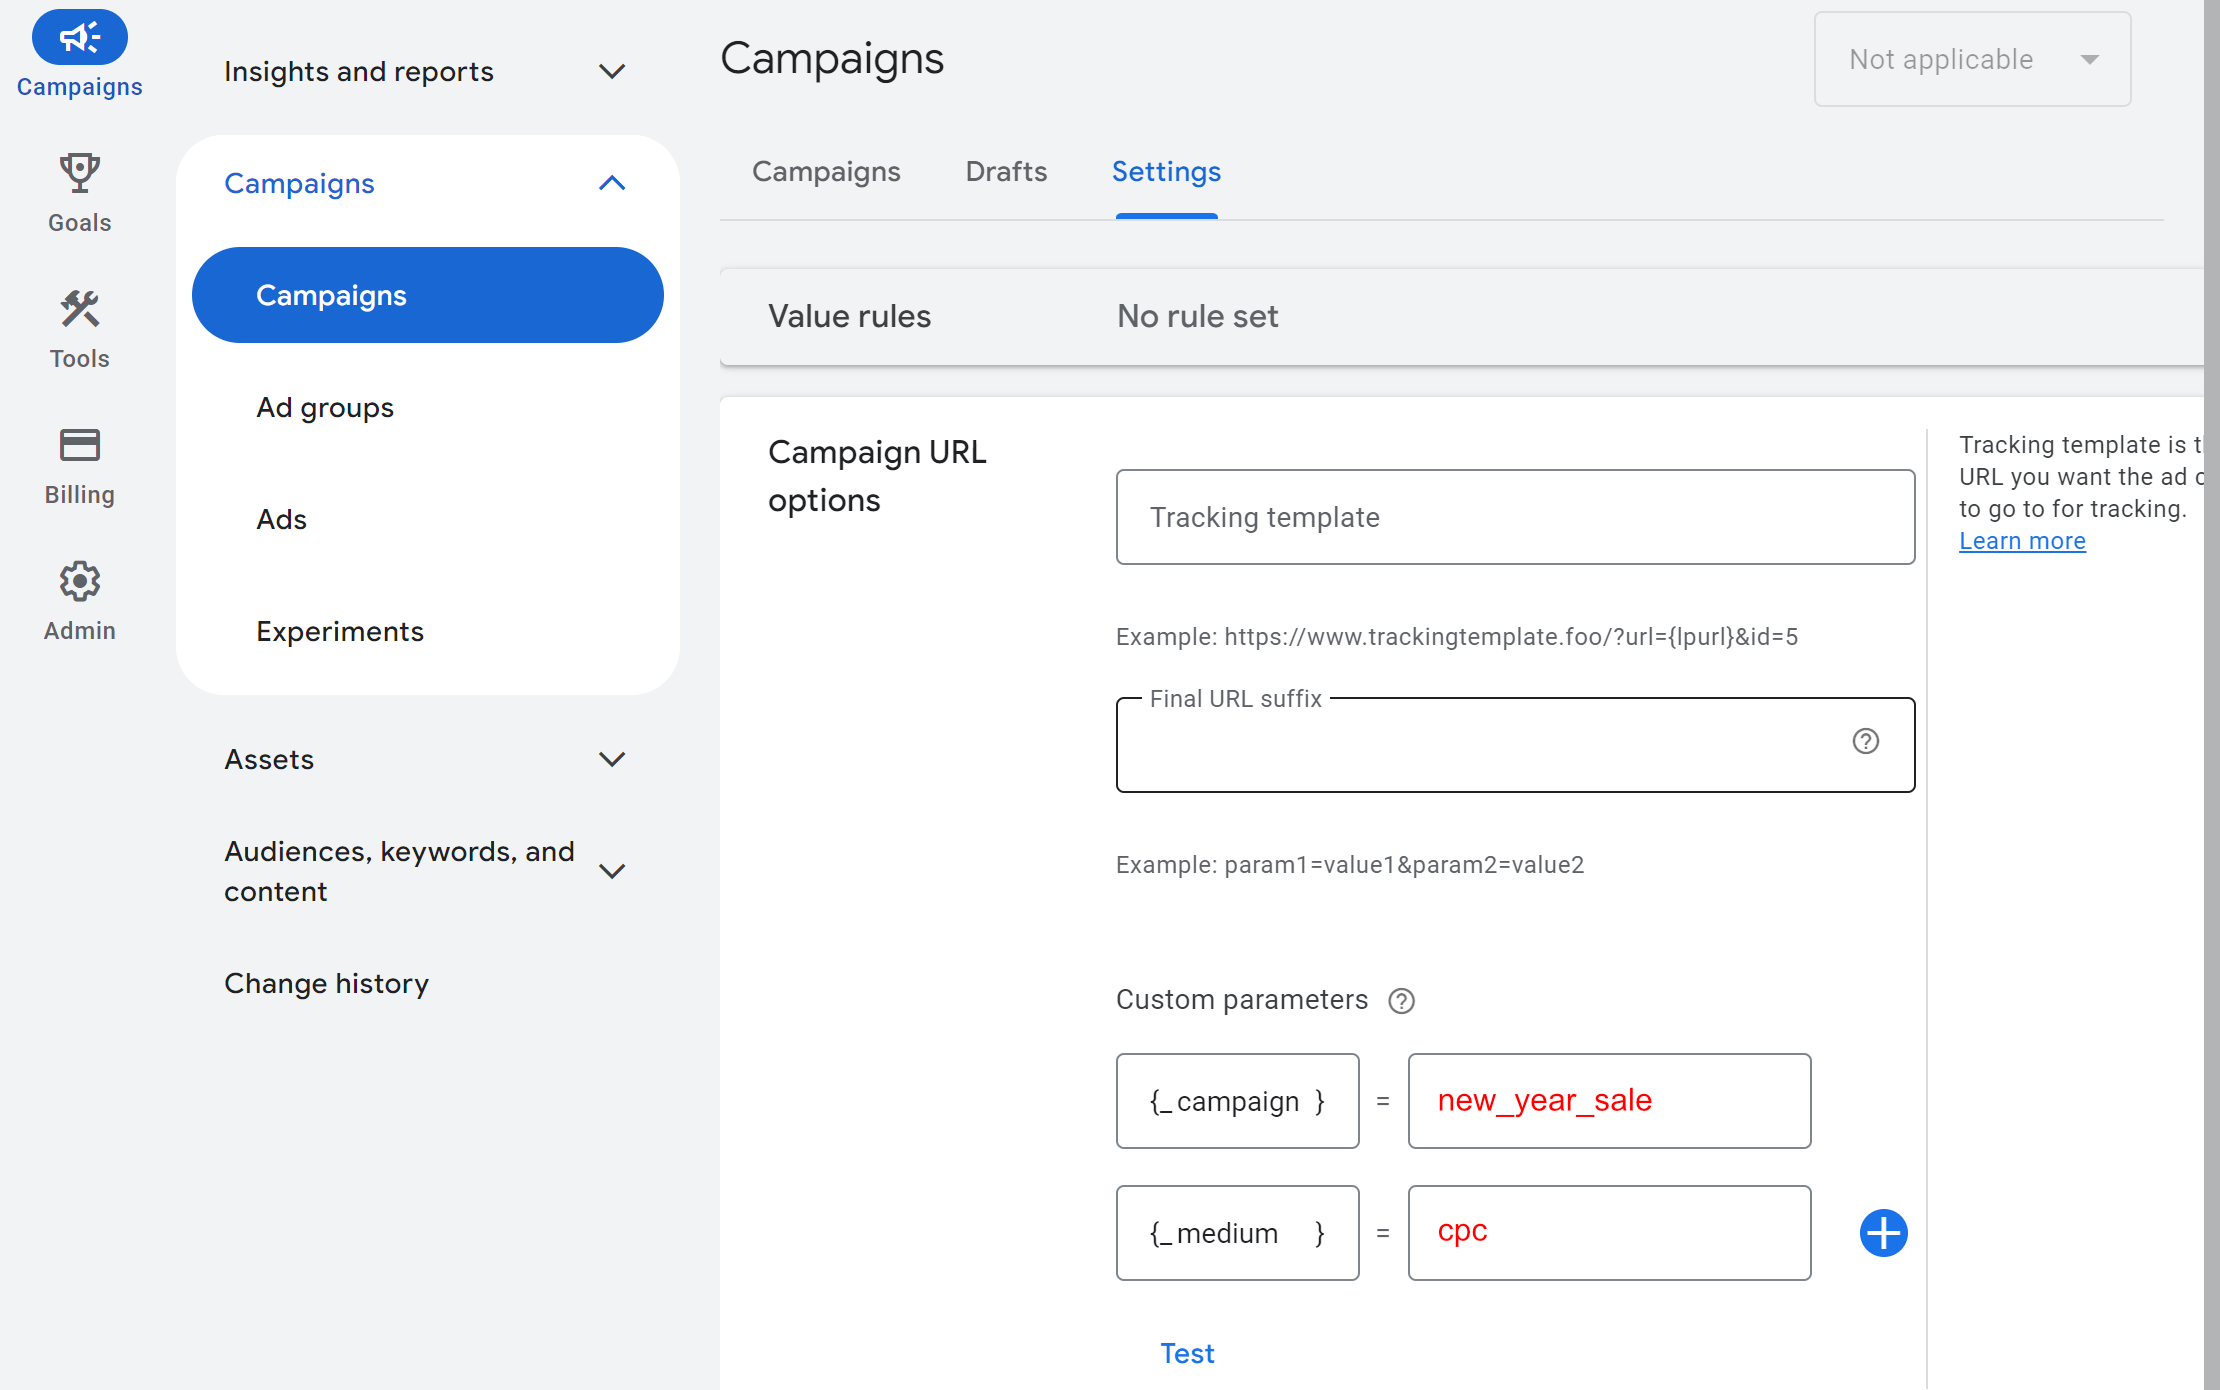
Set Custom Parameter at Campaign Level
- Login to your Google Ads account.
- Go to your Campaigns > Campaign.
- Look for the Campaign Settings.
- Click on Additional settings > Campaign URL options.
- Set Custom Parameters:
{_campaign} = new_year_sale
{_medium} = cpc- Save.
- Repeat again for all of your campaigns but set the appropriate campaign name for each.
Step 3: Set the Final Suffix URL
In this section, you can use our basic “Final URL Suffix” template which we have constructed below.
But first determine if you want to use the same Final URL Suffix template across all of your campaign or if you would like to customize the template per campaign.
Account Level
If you want the same tracking URL format to be applied across all of your campaigns, then you would need to set this at the Account level settings.
- Go to your Google Ad account.
- From the side menu > Campaigns > Overview.
- From the side menu > Admin > Account settings > Tracking.
- Set the Final URL Suffix and click on Test.
utm_source=google&utm_medium={_medium}&utm_campaign={_campaign}&utm_term={keyword}If you look at the Final URL Suffix template above:
- utm_source is set to “google”.
- utm_medium is set to {_medium} which is a Custom Parameter.
- utm_campaign is set to {_campaign} which is a Custom Parameter.
- utm_term is set to {keyword} which is a ValueTrack parameter.
Campaign Level
But if you would like to further customize the tracking URL format for each campaign, then you can set the Final URL Suffix individually at the Campaign level.
- Go to your Google Ad account.
- From the side menu > Campaigns.
- Select a particular Campaign > Campaign Settings (gear icon).
- Additional settings > Campaign URL options.
- Set the Final URL Suffix and click on Test.
utm_source=google&utm_medium={_medium}&utm_campaign={_campaign}&utm_term={keyword}Step 4: Test Tracking Setup
It is important that you always test the tracking setup whenever you do changes that might affect the tracking URL.
You can find the Test button at the following screens:
- Account Settings > Tracking > Test.
- Campaign Settings > Additional Settings > Campaign URL options > Test.
Based on the screenshot below, when you hover your mouse on the link, under the “Attributes used” section, you can see the value for the Custom Parameters are being shown.
Conclusion
That is all you need to prepare your analytic tools to understand the traffic that your Google Ads is bringing to your website.
In this tutorial you have accomplished the following:
- You have learnt how a Google Ads tracking URL looks like.
- You have also learnt to use the Custom Parameters and ValueTrack parameters in your Google Ads Final URL Suffix.
In our next article, we will teach you on how to capture these UTM parameters on your WordPress website for conversion tracking purposes.